
Quick Answer:
Preparing your home before a whole house painting project mainly means clearing rooms of small items and décor, protecting or removing furniture, confirming your final color and finish choices, flagging any known wall damage, and planning around pets and daily routines. Homes that are properly prepared before full-house painters arrive in Naperville tend to see faster, smoother projects with fewer mid-project delays.
Quick Summary
Clear small items, décor, and fragile belongings from every room being painted
Move or protect furniture that's staying in place during the project
Finalize paint colors and finishes before the crew arrives, not on day one
Flag any known cracks, dents, or wall damage during your estimate walkthrough
Plan for pets and household routines around active work areas
Remove wall plates and switch covers if you're comfortable doing so
A prepared home lets your crew start working immediately instead of losing time to setup
Table of Contents
Why Preparation Affects Your Project Timeline
Room-by-Room Preparation Basics
Preparation Checklist by Project Size
What to Avoid When Prepping Your Home
Step-by-Step: Your Pre-Painting Checklist
Common Mistakes Homeowners Make
Practical Tips for a Smooth Start
Frequently Asked Questions
Why Preparation Affects Your Project Timeline
A whole house painting project moves at its best pace when the crew can walk in and get straight to work. Every hour spent moving furniture, waiting on a color decision, or working around clutter is time that could otherwise go toward the actual painting. This is one of the most overlooked factors in how quickly a project wraps up, and it's entirely within a homeowner's control before the crew ever arrives.
Beyond speed, proper preparation also protects your belongings. A rushed setup increases the risk of paint splatter on furniture, dust settling on surfaces that weren't covered in time, or valuable items left in harm's way simply because there wasn't time to move them properly before work began.
Did You Know?
Painting contractors often report that homes prepared in advance can shave a full day or more off a whole house project compared to homes where setup and clearing happen on the fly, time that would otherwise go directly toward the actual painting work.
Room-by-Room Preparation Basics
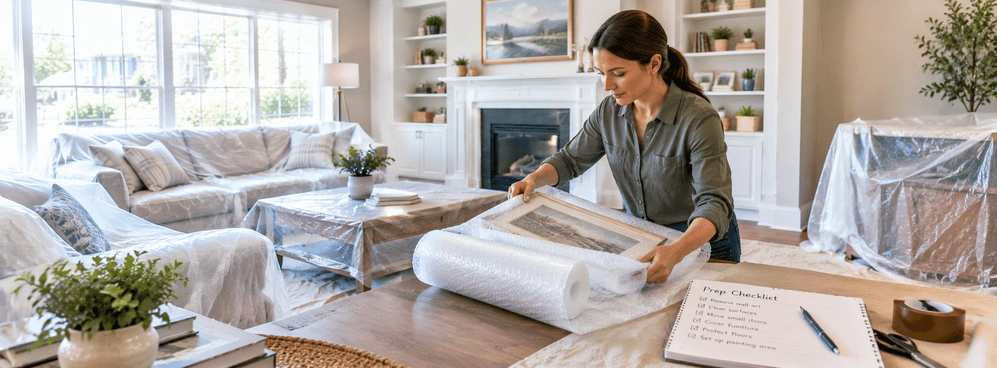
Every room being painted benefits from the same basic preparation steps, though the scale changes depending on how much is in each space. Bedrooms and living areas typically need décor, picture frames, and smaller furniture cleared or moved to the center of the room. Kitchens and bathrooms often require clearing countertops completely and removing anything stored on open shelving. Hallways and stairwells, frequently overlooked, should also have artwork and light fixtures accounted for, since these narrow spaces still need full wall access.
For a truly complete home painting service in Naperville, it helps to walk through the entire house room by room using the same basic checklist, rather than assuming some spaces need less preparation than others.
Preparation Checklist by Project Size
Single Room Projects
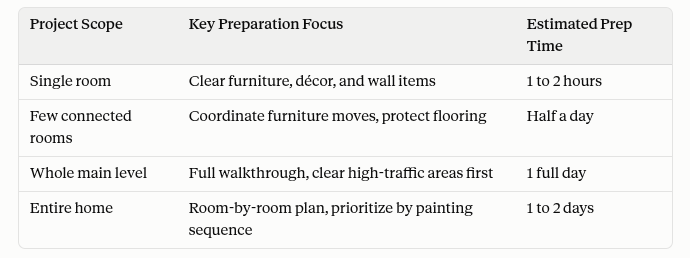
A single room is the simplest to prepare, generally requiring an hour or two to clear décor, move furniture to the center, and remove wall hangings before the crew arrives.
Multiple Connected Rooms
When several adjoining rooms are being painted together, coordinating furniture placement becomes more important, since items moved from one room sometimes need to go into a space that isn't being painted.
Whole Main Level Projects
Preparing an entire main level, kitchen, living room, dining room, and connecting hallways, typically takes a full day of clearing and protecting, especially in open floor plan homes where several spaces flow together.
Entire Home Projects
For a truly whole house paint job near you, preparation often spans one to two days, ideally tackled room by room in the same order your painters plan to work, so the most immediate rooms are ready first.
What to Avoid When Prepping Your Home
Avoid waiting until the morning of your project to start clearing rooms
Avoid leaving valuable or fragile items in rooms being painted, even if they seem out of the way
Avoid skipping communication about any known wall damage until the crew discovers it themselves
Avoid finalizing paint colors at the last minute, which can delay the start of actual painting
Avoid assuming pets will be comfortable around active work areas without a designated separate space
Step-by-Step: Your Pre-Painting Checklist
Remove small décor, picture frames, and fragile items from every room being painted
Clear countertops, shelves, and tabletops completely in kitchens and bathrooms
Move furniture to the center of each room, or arrange for it to be relocated entirely if needed
Confirm your final paint colors and finishes with your contractor before the scheduled start date
Walk through your home and note any cracks, dents, or wall damage to mention during setup
Designate a pet-free or low-traffic zone for active work hours
Remove wall plates and switch covers, or confirm with your painter that they'll handle this step
Set aside a small area for the crew to store equipment and supplies throughout the project
Common Mistakes Homeowners Make
Underestimating how long it takes to properly clear multiple rooms before painting begins
Leaving breakable items on shelves or countertops in rooms being painted
Not communicating existing wall damage until the crew notices it themselves
Waiting to choose paint colors until the painters have already arrived
Failing to plan for pets, leading to stress for the animal and slower progress for the crew
Practical Tips for a Smooth Start
Start clearing rooms a few days ahead of your project rather than the night before
Take photos of any wall art or furniture placement you'll want to recreate once painting is finished
Keep a small folder or note with your finalized color choices, finishes, and any special instructions for easy reference on day one
If your home has any wall repair needs you're unsure about, mention them during your estimate walkthrough so the scope and timeline account for it upfront
If you're not sure how long your specific project will take once prep is complete, it's worth reading through this realistic whole-house painting timeline breakdown so you know what to expect day by day, from setup through the final walkthrough.
Frequently Asked Questions
Do I need to remove all furniture from rooms being painted?
Not necessarily. Furniture that's staying in place can often be moved to the center of the room and covered, though clearing as much as possible generally helps the project move faster.
How far in advance should I start preparing my home?
Starting a few days before your scheduled project date is ideal, giving you enough time to clear rooms gradually rather than rushing everything the night before.
Should I take down curtains and blinds myself?
It's usually helpful to remove curtains and lightweight window treatments yourself, though your painting crew can typically handle blinds or more complex window hardware if needed.
What should I do about wall art and photos?
Remove wall art and photos from any room being painted, and consider photographing their placement beforehand if you want to recreate the same layout once the project is finished.
Is it necessary to be home while the crew preps and paints?
It's not required, but many homeowners choose to be present at the start of the project to walk through expectations and answer any last questions before work begins.
Conclusion
A little preparation before your whole house painting project goes a long way toward keeping things on schedule and protecting your belongings throughout the process. Clearing rooms, finalizing colors, and flagging any wall issues in advance all help your crew start working immediately rather than losing valuable time to setup. If you're planning an upcoming project, ProVision Painting is happy to walk you through exactly what to prepare before your crew arrives. Reach out today for a free estimate.